Laravel Installation and Configuration: A Step-by-Step Guide
Technology
Since its initial release by Taylor Otwell back in 2011, Laravel has emerged as a go-to PHP framework for developers to write robust, secure, and fast web applications. Developed primarily out of the need to address challenges presented by the CodeIgniter framework, this powerful MVC PHP web framework focuses on keeping the syntax as expressive, elegant, and simple-to-use as possible – making it possible for developers to launch and deploy their PHP applications at warp speed.
The main reason why Laravel is so popular amongst PHP developers around the globe is its ease of use and a bunch of attractive, unique features, like:
- MVC (Model–View–Controller) Architectural Pattern: Laravel is a fully MVC-compliant framework
- Blade: An innovative template engine
- Artisan CLI: An Inbuilt tool for Command Line
- Eloquent ORM: Advanced PHP Active Record implementation
- Reverse Routing: Defines the relationship between links and routes
- Laravel Query Builder: Provides more direct access to the database by allowing developers to build queries programmatically.
- Unit Testing: An integral part of Laravel
- Secure Migration powered by a version control system for database schemas
- Laracasts: Hundreds of video tutorials allow for an easy learning curve.
So if you’re a developer who wants to get started with Laravel web application development, then installing Laravel on your Windows or Mac machine would definitely be your first step. Through this tutorial, you’ll learn how to install Laravel using Homestead on your Windows PC.
Let’s get started!
Installing Laravel on Windows
When it comes to installing Laravel framework on a Windows PC, there are ideally two ways:
#Through Composer:
It is a PHP dependency manager used by Laravel to manage all its dependencies. So, to use Laravel, the Composer must be installed on your Windows or Mac machine. Also, you’ll need to make sure that your server meets all the requirements listed below:
- PHP >= 7.1.3
- PDO PHP Extension
- XML PHP Extension
- Tokenizer PHP Extension
- Ctype PHP Extension
- BCMath PHP Extension
- JSON PHP Extension
- Mbstring PHP Extension
- OpenSSL PHP Extension
Once your server fulfilled all the above requirements, you’ll need to download the Laravel installer using Composer via this command:
composer global require laravel/installer
Once installed, you can use the laravel new command to create a fresh Laravel installation in your specified directory. For example, the laravel new project command will create a directory named project containing a fresh Laravel installation where all dependencies of Laravel are already installed.
laravel new project
Alternatively, you can also install Laravel via Composer create-project command.
composer create-project –prefer-dist laravel/laravel project
And if you have PHP already installed on your local machine, you can leverage the serve Artisan command to start a built-in PHP development server at http://localhost:8000:
php artisan serve
To configure Laravel on your local machine as well as on your web server, please refer to this link.
#Through Laravel Homestead:
Laravel Homestead, an official, pre-packaged Vagrant box, is the most recommended way to install Laravel on any Windows, Mac, or Linux system.
Since Laravel Homestead fulfills all the system requirements of the Laravel framework, it facilitates developers a much better way to create a wonderful local development environment without installing PHP, a web server, or any other server software. So now let’s dive into the process of installing and configuring Laravel using Homestead on a Windows PC.
How to Install Laravel Using Homestead on Your Windows PC
#Step 1: Hardware Virtualization
When you’re going to install Laravel on Windows, the very first thing you need to do is enabling Hardware virtualization (VT-x). To do this, download the utilities from the manufacturer of your processor:
- For Intel processors, download the Intel Processor Identification Utility.
- For AMD processors, download the AMD-V Technology.
Installing one of these technologies will help you determine whether or not hardware virtualization is enabled on your Windows PC. Here is the screenshot for how to check if hardware virtualization is enabled on a Windows PC.

If hardware virtualization is disabled on your Windows PC, there are several steps you can follow:
Go to your Control Panel and click Programs and Features. Then first uninstall Hyper-V and thereafter click turn windows features on or off in the sidebar. After the Windows Features box is open, unselect Hyper-V if it is selected.
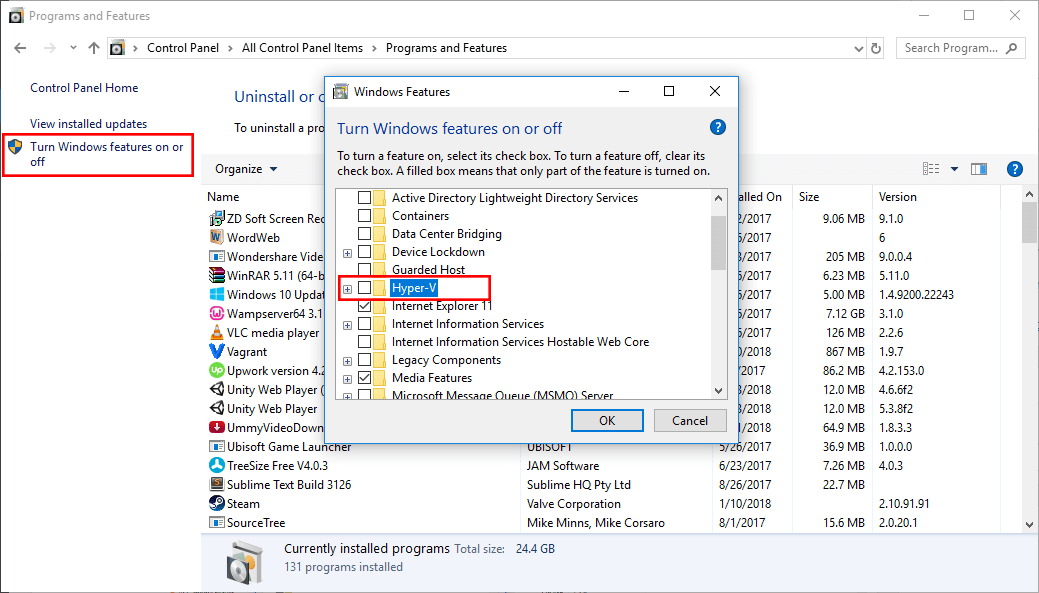
Additionally, you may also enable Intel VT-x or Intel Virtualization Technology via your BIOS setup.
If this doesn’t help, then Google your computer model number or your PC configuration for the solution.
#Step 2: Install Prerequisites
After passing Step 1, you need to download the latest version of the following software:
After downloading the above software, install them on your Windows PC one by one. Be sure to install VirtualBox first of all because Vagrant depends on it.
After the installation, if required, restart your Windows PC to allow above software to integrate with Windows properly.
#Step 3: Install the Homestead Vagrant Box
Once Virtual Box, Vagrant, and Git have been installed, you have to add the laravel/homestead box to your Vagrant installation. Type the following command in your terminal and hit enter:
vagrant box add laravel/homestead
If this command doesn’t work, this means your Vagrant installation is not up to date.
#Step 4: Install the Homestead
To install Homestead on your Windows PC, you have to clone the Homestead repository from Github to a folder named Homestead within your home (C:\Users\USER_NAME where USER_NAME is your username) directory. Type cd ~ on you Git Bash, hit enter and run the following command.
git clone https://github.com/laravel/homestead.git ~/Homestead
Now run this command to change the current directory to C:\Users\USER_NAME\Homestead.
cd Homestead
And then, run the following command from the Homestead directory:
init.bat
This command will create the Homestead.yaml configuration file in C:\Users\USER_NAME\Homestead directory.
#Step 5: Create an SSH Key
Thanks to Vagrant Folder Synchronization that allows you to edit your project files on the host machine i.e. Windows and reflect the changes on the guest virtual machine.
However, to perform advanced tasks such as running a migration, you must log into the guest via the terminal. For this, you’ll require an SSH key.
To check if an SSH key pair already exists on your Windows PC, go to C:\Users\USER_NAME\Homestead directory and find out the folder named .ssh.
If it exists, click the folder and see if two files named id_rsa and id_rsa.pub files are present there. If they are, continue to the next step. Otherwise, create a new SSH key by running the following command with your email address from Git Bash.
ssh-keygen -t rsa -C “your email here”
And then, you’ll see a message like this:
Generating public/private rsa key pair.
Just keep pressing enter for whatever command line asks you and finally, a new .ssh folder containing the two files named id_rsa and id_rsa.pub will be created.
#Step 6: Edit Configuration File
Now go to your Homestead directory and edit the Homestead.yaml configuration file with any source code editor. The original contents of the file should look something like this:
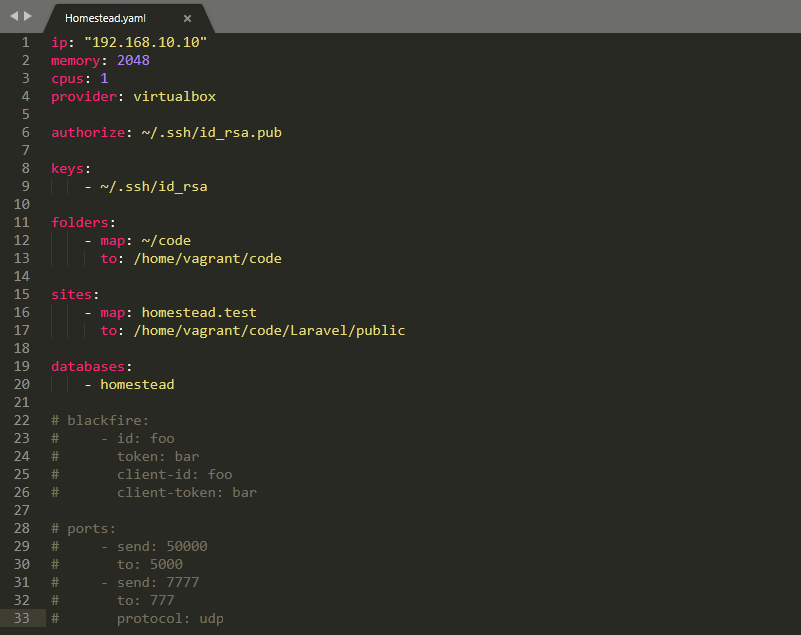
In the Homestead.yaml, the only areas you need to focus on are folders, sites, and databases. Let’s get familiar with the folders section.
Configuring Shared Folders
folders:
– map: ~/code
to: /home/vagrant/code
In the above lines of code, map: ~/code is the folder which is located on our Windows PC and to: /home/vagrant/code represents the folder synced on the virtual machine. You can change the folder name to anything you want. However, for convenience, I’m keeping the folder name as it is.
The generic mapping works just fine if you’re creating only a few sites, but if you think the number of sites will continue to grow in future, you can map every project to its own Vagrant folder in order to avoid performance issues:
folders:
– map: ~/code/project1
to: /home/vagrant/code/project1
– map: ~/code/project2
to: /home/vagrant/code/project2
and so on…
Configuring Nginx Sites
sites:
– map: homestead.test
to: /home/vagrant/code/Laravel/public
In the above lines, homestead.test represents a “domain” mapped to a folder located at /home/vagrant/code/Laravel/public. You may add as many sites as required to your Homestead environment as follows:
sites:
– map: homestead.test
to: /home/vagrant/code/Laravel/public
– map: example.test
to: /home/vagrant/code/example/public
and so on…
Likewise, you can create multiple databases for multiple sites:
databases:
– homestead
– example
and so on…
That’s all about the configuration of Homestead.yaml file!
#Step 7: Configure the Hosts File
You’ll not be able to hit homestead.test or example.test from your browser unless you add them to your Windows hosts file. So navigate to C:\Windows\System32\drivers\etc\hosts and add the following lines at the end of your hosts file.
192.168.10.10 homestead.test
192.168.10.10 example.test
and so on…
However, make sure to keep the IP address same as the one that you set in your Homestead.yaml file. Otherwise, things will not work!
#Step 8: Launch The Homestead Vagrant Box
Once you have edited the Homestead.yaml as per your requirements and added the domain(s) to your hosts file, you can launch the Homestead Vagrant Box using the command given below:
vagrant up
Make sure you run the above command from the C:\Users\USER_NAME\Homestead directory as this folder contains your Homestead repository. To destroy the machine, you can use the following command:
vagrant destroy –force
And If you want to launch the Homestead Vagrant Box from anywhere using Git Bash, create a file named .bash_profile in the C:\Users\USER_NAME\Homestead directory and paste the following lines of code in the file and save it.
alias ..=”cd ..”
alias vm=”ssh vagrant@127.0.0.1 -p 2222″
function homestead() {
( cd ~/Homestead && vagrant $* )
}
And restart Git Bash for changes to take effect. Thereafter run the following command through Git Bash to run the Homestead Vagrant Box from anywhere.
homestead up
To terminate the vagrant box using Git Bash, use the homestead halt command.
#Step 9: Create Your First Laravel Project
Now that your Homestead Vagrant Box is up and running, log in to your Vagrant using the following command:
homestead ssh
Now type ls in Git Bash and hit enter. You’ll now be able to check all the folders presented in the current directory.
Since till now we only have one folder named Code in the current directory, type cd code to change the current directory to Code. Now run ls command again to verify if this folder is empty. Then run the following command to create your first Laravel project:
composer create-project –prefer-dist laravel/laravel Laravel
The above command will create a fresh Laravel project under the folder name Laravel. Now go to your Code directory on windows and you will see a folder named Laravel there. Congratulations! You have successfully created your first Laravel project.
#Step 10: Running the Application
Now run http://homestead.test (or example.test) from your browser and you should see the default Laravel Welcome Page now.
Finally, open Code folder with your favorite text editor and start creating your first Laravel application.
Hopefully, you’ll find this tutorial helpful and informative. Contact us to Hire Dedicated Laravel Developers.
Recent Articles
-

With the constantly increasing usage of Smartphone devices, mobile apps have become an inevitable part of our lives. Today,...
Read More -

If you’re new to custom web development, you must have heard the terms “frontend” and “backend” quite a lot....
Read More -

Great Teams make Great Things! The above is especially true when you want to build a high-quality website or...
Read More